Friday, March 7, 2014

"Ghosting" with Lindy's Stamp Gang mists

                                    It's miserably cold rainy day here in North Carolina
                                         and so I was doing some housekeeping deeds.
                             One of which was hanging some layouts in my daughter's room.
As I did I realized maybe I could come back and do a quick tutorial on how I created the backgrounds    
                                        using a variety of Lindy's Stamp Gang mists.


                                            Now I used blues greens & purples on my layouts
                                       but I pulled out some of my newer colors for the tutorial.

A while back I saw a tutorial on how to do a "ghosting technique"
with Dylusions mists and how the technique
COULD ONLY BE DONE WITH DYLUSIONS
I like Dylusions but love Lindy's
 so I started wondering if maybe I could do the same thing with them.

What you need…
5-6 Lindy's mists
 ( I used Cathedral Pines Green, Winter Jasmine Gold, Poinsettia Red Gold, Frosted Purple Iris, Hagworts Orange, & Screamin Banshee Black)
Watercolor paper
Mister bottle filled with water
Heat gun
Stencils
Paper towels
I used watercolor paper only because I knew I was going to mist the daylights out of the paper and didn't want it to warp as much. 
You could use card stock but be prepared…it will warp.

Mist the first color heavily so it pools and drips.
Dry completely with your heat gun.
(this prevents the colors from getting all muddy)

Add your second color dripping and pooling again.
Dry it completely

Continue to add layers of colors until the paper is covered.
MAKE SURE TO DRY COMPLETELY IN BETWEEN EACH ONE :)


I added some black near the end for a contrast to the bright colors.
(trust me they are bright 
but when you have torrential rain and haven't seen sun in 3 days
 they don't photograph as well)

Now that everything is dry it's time to get the "ghost effect" going.

Lay your first stencil onto the paper and mist with water.
Count to 5, lift up the stencil and count to 15.
Blot with a paper towel.
The water reactivates the mist and when you blot it you lift some up
leaving a lighter image, as if stamping with bleach.

Dry the paper and place another stencil down, mist, count, blot, dry.
You can do this over and over
until you are happy with the background you created.

In this picture you can see how the stencils are showing up on the background.
Again in real life it looks better, 
Mother Nature is not cooperating with my photo taking needs,
maybe  the sun will shine tomorrow????????


One more layout to share.
The background makes it so little embellishing is needed after.
Some chipboard letters and machine stitching and 
done

                              
                            If you try this make sure to send me a link…I'd love to see what you do.

                                              Thanks for stopping by and have a great day.

Thursday, March 6, 2014

Mojo Monday (even though it's Thursday)

Double posting today 
whoohoo
mostly cause I seem to have a theme going.

Early I stated how cards just stymie me
yet every once in a while I muddle through for
special people.

Right after I posted the 2 birthday cards I realized I needed to make one more.
AAACCKKKK
what to do what to do.

Luckily I remembered
and their weekly card sketches.
To the rescue it came…
and using this weeks sketch,


Combined with Graphic 45 papers
Birdsong
I whipped up this card in no time.
The G45 papers came from an 8x8 paps which was perfect for this card.
Layering the images on
cardstock.
Inking the edges and bam it was done.
(almost painless lol)

Thanks for stopping by and have a great day.


Birthday Cards...


Now I am not much of a card maker.

I always find this funny because I will gladly work on really small things
ie: inchies or ATCs
but ask me to make a card and I freeze up.

Still several friends had birthdays this past month
(yes past as in February)
but I was bound and determined to make them both cards.
I put it off for the entire month but we are now into March
and it's time to get busy.

I used Club Scrap card stock and
 images
from a Crafty Creations sheet.
The splits were made using a Tsukinkeo ink cube
and a Tim Holtz stencil.

Time to pop these in the mail 
and cross my fingers I won't have to make any more for a while.

Thanks for stopping by and have a great day.

Wednesday, March 5, 2014

Teen Angst

So I was jumping around the web yesterday 
checking out favorites and some where I haven't been in a while.
I stopped by 
and discovered a new March sketch challenge up.

I was in the mood for working with a sketch and this one
was screaming "work with me"
so of course I did lol.
Here is the sketch….
This is what I created.
I used paper from the February Swirlydoos kit.
Kaisercraft paper and Die Cut
Archival ink, Club Scrap stamp, Gesso,  Dylusions mist, Petaloo flowers and some old sticker letters
(and when I say old I mean so OLD they no longer stick ugh)

A while back we took a family trip to Italy.
As always we travel en masse so after a while even the
best of us start to crave some alone time.
When you are a teenager though you crave it faster and feel more persecuted
than the rest.
These pics were snapped wile visiting Assisi.
She had had enough of all of us and went over by some old ruins to sulk.

Luckily later in the day some Gelato brought her out of her funk….
Here are my non stick stickers.
I roughly outlined them with a Sharpie to make them stand out a bit more.

My flowers and a Die Cut from Kaisercraft.


Gesso was scraped over the background before I did some stamping using Archival Ink and a Club Scrap stamp.


I think I'll hold onto these pics so that when she has her own teenagers I can 
share  with them.

Thanks for stopping by and have a great day!

Tuesday, March 4, 2014

Documented Life Project Week 10!

Time for another entry for

This weeks challenge is 

March 1, 2014 Challenge (Week Ten) - Make a list of the things that make you YOU.

I used Watercolor paint as a base layer.
Stamping and stenciling on top.
The tag was created as an example piece for a tutorial to be posted on Thursday at 
Scrapping Everyday Miracles.
I used my sewing machine to attach it to my page.
The words are from an old sheet of Rub Ons.
I'm figuring that at some point I will finally use up my stash of them
(but probably not for a long time lol)

Underneath I wrote a list of 
ME things
using Liquitex Acrylic Ink and my pen nib.

There is more journaling on the backside of the tag but that is for me alone.

Make sure to check out the Flickr and Facebook page to see
how others have interpreted this challenge.

Thanks for stopping by and have a great day.

Monday, March 3, 2014

Craft Hoarders Challenge 3 Vintage/Retro use your hoard!

It's time for another challenge at

Graphic 45 is our sponsor this month, so let's see what you can make in a vintage or retro style. Do you hoard lace or vintage hat pins? 
Do you snap up all the postcards at yard sales? 
Do you love mid-century modern? Do you long for avocado appliances and orange shag carpets? 
Show your vintage or retro spin on a paper crafting project.

One lucky person will win this AWESOME
prize (did I say awesome yet) pack 
from 
Graphic 45 is an award-winning scrapbook and paper crafting company­— owned and operated by a mother (Diane Schultz) and her two daughters (Aimee and Charee Filimoehala). Together they create vintage inspired crafting products that capture the flamboyant style of the 1920's and 30's - with vibrant color, irresistible texture and imaginative design to create products with decades-old appeal that's both fresh and familiar. Let our products inspire your next scrapbook layout, card, album or home decor project. Please visit the Graphic 45 Website or Facebook page for more information.

This is the project I created:
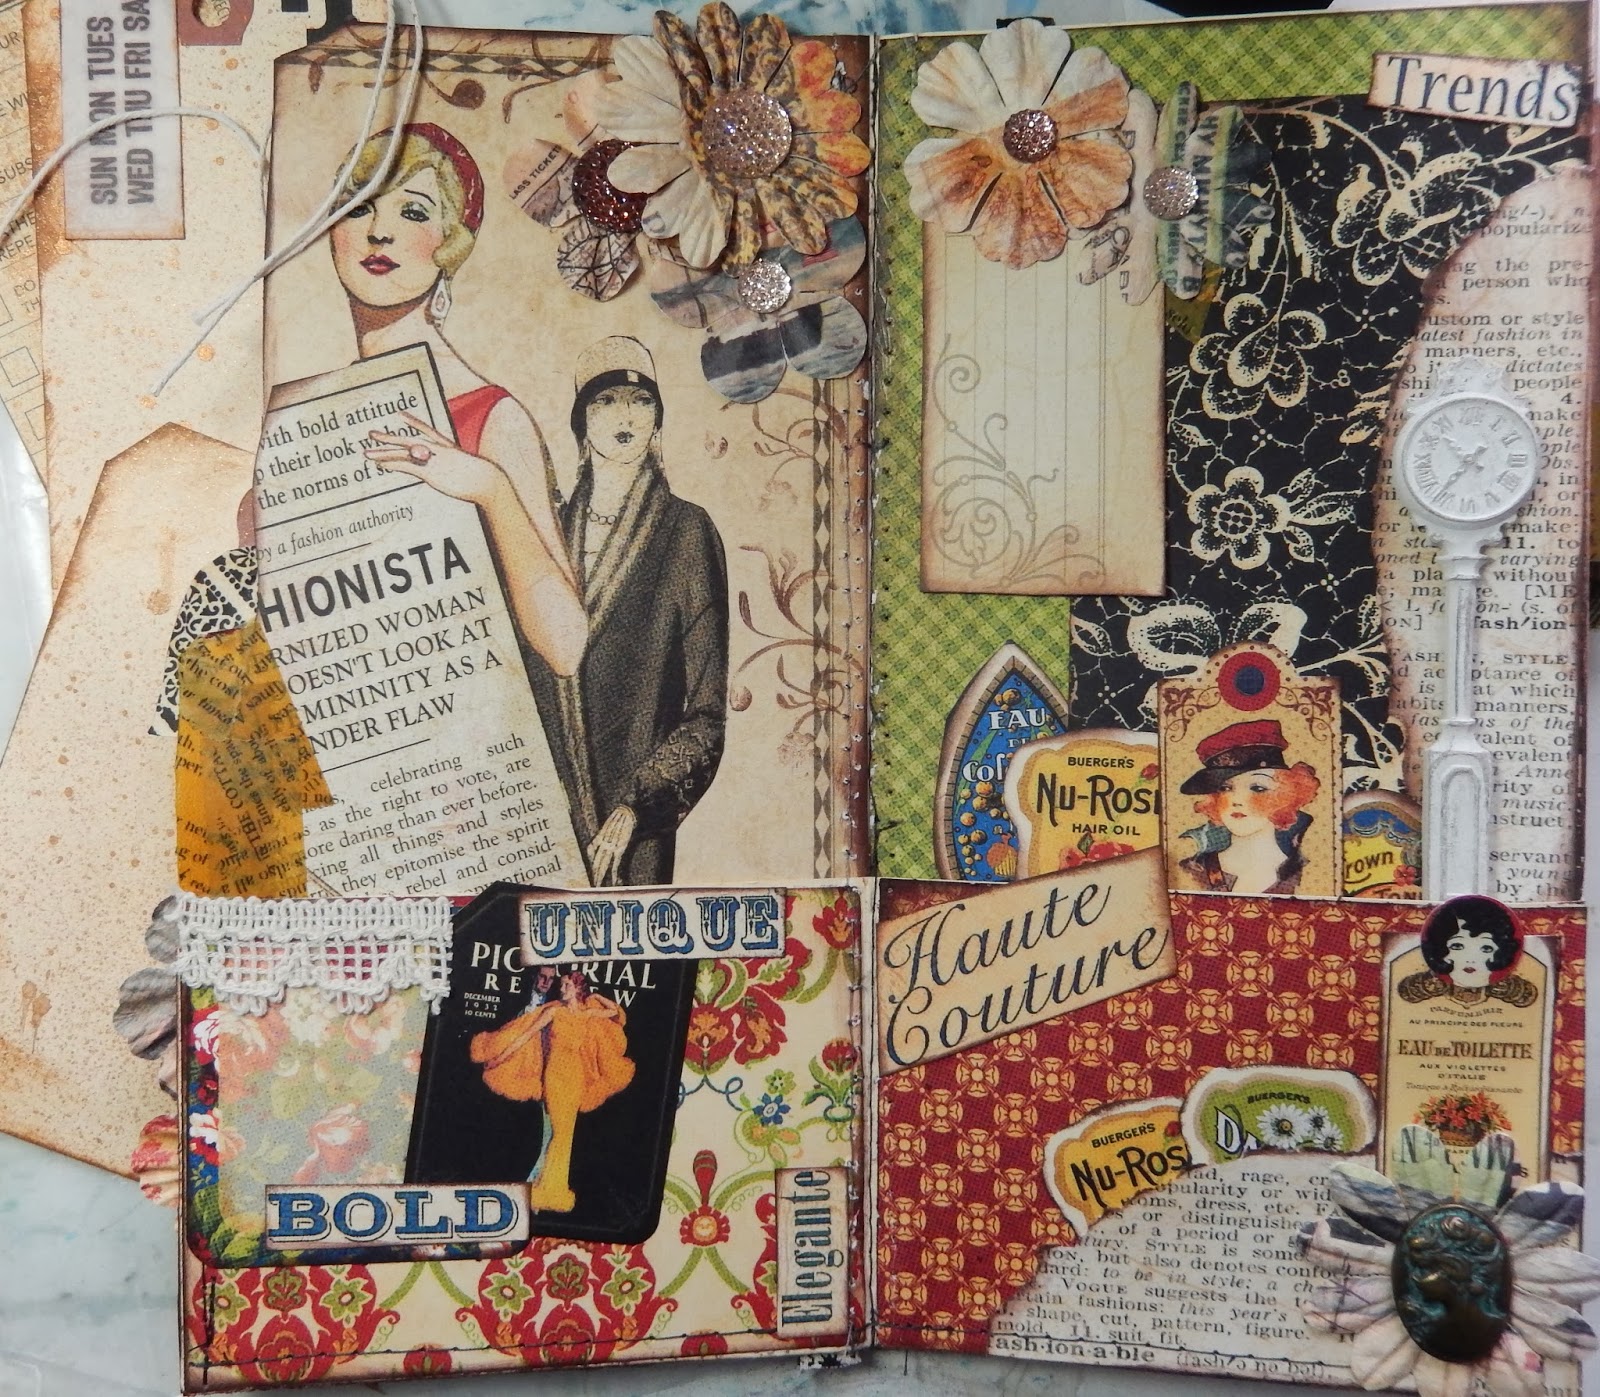
I took a Manila File Folder
(it had been used to actually hold papers before and even though it had writing on it I didn't care…it was going to be covered)
and with a couple of folds plus my sewing machine created this
mini album.

It is then decorated with paper from both the 
Fashionista line
 (hoarded all the way from 2009! YES I had a moment of silence before I cut into it)
and A Place in Time.

The inside of my folder album has
several pockets where I can tuck multiple tags.
Some tags are decorated with fussy cut images from the paper,
others are misted or stamped on.

Here the tags are out showing underneath them.

and with the tags in.
Lots and lots of room to write ideas and thoughts down.

The next set of pages with tags in and...

Tags out.

Closeup of my cover.
Multiple images were fussy cut from the paper and layered over each other.
The flowers and bling added on top with a few beaded stickpins as the
final bit.

Little bit of fabric from fabric stash
 (yes I am an equal opportunity hoarder)
was sewn on to created a binding.

Supplies: 
Graphic 45: Fashionista & Place in Time
Graphic 45 brads, Hampton Art Flowers,
Prima Resin Piece, Kaisercraft Rhinestones,
Clearsnap ink, Washii tape,
Manial File Folder


Make sure to check out what the rest of the design team has done for this challenge
                                         Donna Idlet - http://myblogidlet.blogspot.com/
                                         Glenda Brooks - http://glendabrooks.blogspot.com
                                         Gloria Stengel - http://gloriascraps.blogspot.com/
                                         Karen Zueger - http://lostcoastscrapper.blogspot.com
                                         Pam Bray - http://www.pammejoscrapbookflair.com/
                                         Tammi Bennett - http://www.tjsmemoriesblog.blogspot.com/
                                         Amber Milone - http://pinkchicpaperdesign.blogspot.com/
              you are here-----Christy Butters - http://creatingwiththegirls.blogspot.com/
                                         Debbie Seyer - http://www.debbieseyer.com/
                                         Ginny Nemchak - http://pollyspaper.wordpress.com/
                                         Jan Marie Ennenga - http://re-creations4him.blogspot.com/
                                         Kathy Clement - http://www.kathybydesign.com/kathy-by-design-news/

and make sure to head HERE 
to link up your project for a chance to win this awesome prize pack.

Saturday, March 1, 2014

It's time for a new challenge at Scrapping Everyday Miracles!


It's time for another challenge at 

The theme this month is 
Laughter is the best medicine

You have 3 ways of entering each month
-Use the theme and create whatever you desire
-Use the card sketch provided on the blog
-Use the layout sketch provided on the blog

I created a piece using the theme
and...

Here is what I created.
I started with a blank page in my art journal and randomly add some torn pages from a book.
Misted with Buccaneer Bronze Moonshadow mist from Lindy's Stamp Gang.
Some Distress Paints and Silk's Acrylic Glazes on top of that.

Cheesecloth and Rub ons

I fussy cut the flower from a piece of Prima paper.
The image was a free one in a Stampington magazine.

Chipboard colored with Distress Paint, then a Copper Paint dabber 
and finally rubbed with black ink.
Prima letter stickers were outlined with Sharpie to give my title.


Make sure you link up your challenge via the Linky tool 

and check out what all the other design team members created this month to inspire you.


Thanks for stopping by and have a wonderful day!