Monday, December 30, 2013

Joy

Christmas has come and gone
(much to my relief)
Having only 4 weeks between Thanksgiving and Christmas really threw me this year.
I seemed to be constantly rushing and never really caught up with anything
(which might be why presents are still arriving at the house 5 days later).

Anyway it was my turn to create for the Swirlydoos Round Robin
Now this is usually a layout based challenge but with it being a busy time the hostess Peggy suggested tags.
Phew, because I can knock a tag out quick, if it was a layout I probably would still be working well into the new year.


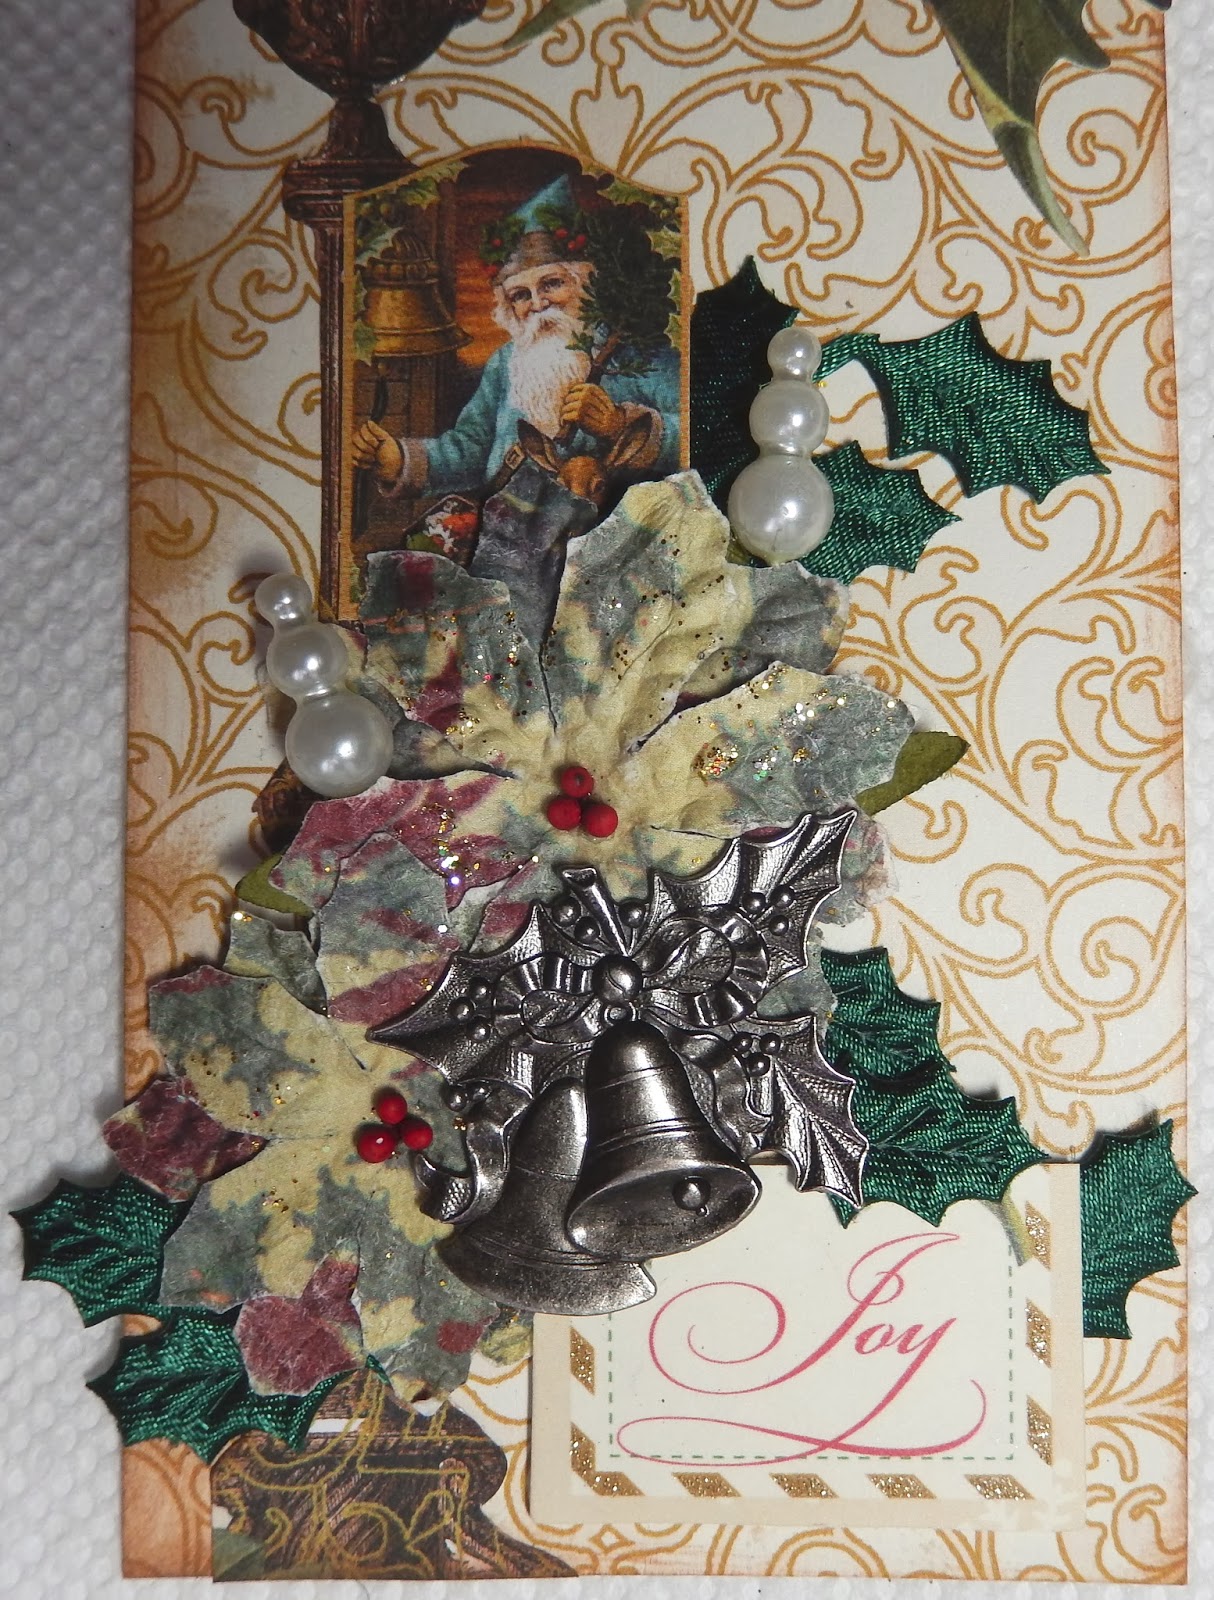
My paper was from a scrap of Webster's Pages.
After fussy cutting the lamp I created a little cluster with flowers,
a Tim Holtz metal piece, some stick pins 
and bit of holly leaf trim.


I hope that the Holiday season didn't run you all too ragged.

Here is wishing each and every one of you a happy and healthy 2014.

Thanks for stopping by and have a great day!

Sunday, December 1, 2013

Christmas is coming….


                                                               It is official!
December 1st is here and for many, the season of Advent is starting today! As one of the most beloved holidays in the Christian faith, Christmas is truly a wonderful time of the year when we commemorate the birth of Jesus!

                  To help celebrate and inspire you to create we are having a special
                                               Christmas Creations Challenge
                                    over on the Scrapping Everyday Miracles blog.

               The design team members have created a ton of Holiday projects to inspire you.
                                                          Here are a few from me.
To me Christmas is about the little things. Like finding my 2 youngest sound asleep on Christmas Eve.
In a time when it seems to be more go go go than anything else this respite immediately spoke to me.
Family is the most important thing.


For this layout I'm showcasing the girls again.
I try every year to get a picture of them in front of the tree.
As I am constantly taking pictures you can see they approach this without much in the way of gravitas.
Someone always needs to be goofing off.
I suppose I could get upset, but in reality it's how our family is and I wouldn't trade it for the world.

The background paper was swiped with Gesso then misted heavily with Tattered Angels Glimmer Mists.
Petaloo flowers, red burlap and gold embossing finish it off.


Last but not least is one of my most favorite Christmas layouts of all time.
The background is Pink Paislee resist paper colored with Distress Inks.
Various stamps from PP were also used with black StazOn to add to the page.

The circle frame was colored using silver Lumiere paint by Jacquard

Some torn papers were layered underneath the photo.

and to finish it off lots of flowers and flourishes.

I hope these layouts inspire you to create for the season.
Remember head over to Scrapping Everyday Miracles to see what everyone is creating and join in on the challenge.

it is easy enough ;)


Your challenge is to create a project of any kind that celebrates Christmas!  You may enter as many unique projects as you like, and with as many other challenges as you like!  *Please mention Scrapping Everyday Miracles blog, AND link back to our challenge!  Winners will be announced on December 28th! 

Thanks for stopping by and have an excellent first day of December.
Peace to you all.

Saturday, November 30, 2013

A child is the greatest joy

Another favorite today.

This one is more scrapbook and less mixed media for the page.

The littlest one when she was about 18 months.
The photo went perfectly with the paper.


The frame was painted , stamped on then heavily misted with Glimmer mist.
Several floral vines were wrapped around, as well as the addition of more flowers from Petaloo and butterflies from BoBunny.

The title of the page says it all…
It's how I feel about all my kids.


Thanks for stopping by and have great day.

Wednesday, November 27, 2013

Children are like flowers...

Continuing on with my favorites this week.

This is a layout created while spending the weekend at Donna Downey's studio 
in Huntersville,NC.
I'm lucky to live close by and even luckier to have a group of friends who like to get together there for crafty weekends.

The base of the layout is a piece of 12x 12 canvas,
painted heavily at the top with acrylic paint and then misted, misted , and misted more to make the paint run and drip covering the wile page.

By doing this you get streaks of darker colors in spots and lighter in others.
The tags were added on in homage to Donna (she loves her brown holes) and I machine stitched a border just to keep the canvas from really fraying over time.
Plus I just love machine stitching.

The flowers are a combination of pre made and die cut ones from book text.
Ribbon was used as stems and attached with eyelets.
The leaves were cut free hand then inked and distressed before being added.

again the flowers…too fun

The photo was layered over a die cut. 
Some pop pom trim was added at the bottom just for fun.


Thanks for stopping by and have a great day.

Monday, November 25, 2013

Bliss

Seeing as this week brings us Thanksgiving in the US,
and many of us are busy with traveling, eating, cooking, and spending time with family,
I decided to take the week to go back and share some of my favorite layouts I have done over time.

This one is titled BLISS.

We don't have pets here (besides goldfish).
Our schedules are way to hectic and it wouldn't be fair to them.
One day though our neighbors dog Coco tried to get on the bus with the oldest in the morning.
Her owners weren't home so I put her in the backyard where she and the little one spent the entire day playing.


The look on my daughter's face in this photo says it all.
She is definitely in bliss.
The paper was swiped with Gesso and misted with Glimmer Mist.
Dry SAnd ink by Prima was rubbed through a Crafter's Workshop stencil.

Prima flowers and resin pieces as well as lace from my stash finish it off.


I hope this week finds you enjoying time with friends and family.

Thanks for stopping by and have a great day!

Saturday, November 23, 2013

New Art Journaling class!!!


It's time to pull out the watercolor crayons and combine them with a variety of stencils to 
create another page in your ever expanding art journal. 

We'll layer and mix and shade as we color our way through the page and using the stencils, 
we'll add pattern and even more color until the page is just right.
 
Part of the ongoing Creating an Art Journal series, 
this one-hour class will take you from start to finish in creating a new entry in your art journal. 
Each lesson focuses on products and techniques to get you comfortable in creating art as unique 
as you are.
The class retail at $5.99

Below are some images from the class


Head on over to 
to check out this class as well as the complete lineup of classes offered.

Thanks for stopping by and have a great day!

Friday, November 22, 2013

Where are YOU going?


Ever have a day where yo wander around aimlessly?
You KNOW you should be doing something but just can't settle on what, or even where.

This page came about from that restlessnes.
I knew I wanted to work on something but couldn't settle on what. Bouncing around from project to project with nothing really catching my attention.

Then I came to this page.
Several year ago my oldest was bored in class and wound up folding tissue paper into tiny squares and dip dying it into watercolor paint.
She didn't need them for anything so as usually is the case here they became mine, where they sat on the desk forever.

Until today.
I applied one layer of tissue paper using gel medium, wasn't totally happy with the coverage so applied a second layer of the tissue paper on top.
I then swiped Gesso over the page in spots (there was way to much purple & orange before I did).

I then used a wet brush and a very light coat of Silks Acrylic Glaze in Teal Zircon. I love these paints, they cover completely but still are translucent enough for the background to shine through.
Once it dried I added Bolivian Blue in some spots.

BoBunny background stamp and Archival ink.
Followed up with a ton of RubOns (still didn't make a dent in the stash though)

Some ink was rubbed through a Crafter's Workshop arrow stencil and a Club Scrap question mark stencil.


I'm happy with what my aimless wanderings produced. I may not always know where I am going but I definitely enjoy the trip.
Now if I could apply the same energy to the suitcases that need packing….


Thanks for stopping by and have a great day.

Thursday, November 21, 2013

Laugh Out Loud


Sharing a mixed media layout today.

This has to be one of my favorites that I have done over the years. The joy on my daughter's face just makes me smile no matter what kind of day I am having.
It came about one summer when we were on Kiawah Island for a week.
There is wildlife EVERYWHERE and one thing we saw a ton of were the little lizards.
Now if you have ever seen them in person you know they are FAST and catching them is usually a failed attempt.

One evening we came out to get in the car for dinner and there was one sitting right on the steps.
The little one proclaimed she was going to catch it…
"sure baby you do that" 
(cause there is NO CHANCE that it was going to happen)

When BAM
Girl reached down and came up with it, tail between the fingers and laughing hysterically.
Here is the layout I created capturing that moment... 

The base was a piece of cardboard box I cut to a 12x12 size and heavily distressed.
Gesso was painted over it and once dried Glimmer mist was sprayed fairly heavy.
Torn pieces of patterned paper were inked and layered under where the photo was going to go.

I distressed all along the edges of my photo with water, then acrylic paint. 
I wanted to focus solely on her.
Once I placed the photo I stamped around and on it.

Layers of lace, trim, flowers and baubles were added.

The frame was painted and pearls added. 
I used it to frame the lizard so proudly hanging between her thumb and pointer.

More stamping along the edges of the layout.
Because of the distressed cardboard only partial images showed up in most spots.
Becoming a subtle part of the background.

The letters used to create the title are canvas.
They were colored with Smooch ink by Clearsnap and then outlined with black acrylic paint.


Thanks for stopping by and have a great day!


Tuesday, November 19, 2013

Plot Twist

Ever have one of those days where NOTHING seems to go right?

Monday was one of those days.
Half of us over slept and wound up having to seriously rush to get out the door on time,
I smacked my forehead on the wall (my clumsy nature shining through),
a bottle of paint exploded all over me AND the project I was working on,
and on and on.

It led to the creation of this Art Journal page.
 I found the quote on Pinterest a while ago and loved it.
It spoke to me as when things don't go as planned you can either wallow in regret and self pity or move on, and sometimes that "moving on" leads to better things.

I am NOT about wallowing so move on I did.
Case in point…
This page.
It started out as a mismatch of where I cleaned my stencil and stamps.
Once the paint exploded I couldn't work on my original project so I moved over to this page. Using the paint to randomly stamp across it.
Ok, it's looking um….
I then used some NeoColor II's to add more color, dried,
 then stamped with a script stamp and StazOn.
Dylusions mists in Vibrant Turquoise and Squeezed Orange gave bright bursts of color and awesome drips.

                           
                                 Lake Mist acrylic paint was dabbed through Sequin Waste.
                 It reactivated some of the mists and added a bit of color to the off white paint.

Tsukineko ink was then rubbed through a Crafter's Workshop stencil.
Some more stamping with a BoBunny background stamp and Archival ink.

Time for the quote.
I printed it out on copy paper and tore out the words.
After adhering them to the page I made a wash of color with one of my NeoColor II's and colored the white paper.
Once it was dry I went in with a Faber Castell Big Brush pen and colored the letters orange.


In the end my "plot twist" creation ended up making me very happy.
Now hopefully today will go a little smoother.

Thanks for stopping by and have a great day!

Sunday, November 17, 2013

Give Thanks

Today's share is a card I made for a good friend.
I also created it as a sample for the Thanks challenge
at 
There is still time to enter and prizes can be won :)

For some reason I struggle with cards. Working on ATCs and inches NO PROBLEM, pull out a card base and I am a deer in headlights.

No joke it took me 3 whole days just to make this. I stared and stared until I could (in the immortal words of Tim Gunn) 
Make It Work


The base was created with my Gelli plate, some old (and I mean OLD) acrylic paint 
and some stencils.
A piece of lace, Prima flowers and some pearls were added over the print.
The leaves were cut by hand from a scrap of patterned paper and the title was stamped, torn out and inked before being added.


Just a simple card to convey the sentiment of this upcoming Thanksgiving.
For all we have
Give Thanks

Thanks for stopping by and have a great day.

Saturday, November 16, 2013

Every Days Journey….


It's no secret that my kids are the epicenter of my world.
I thought it would be fun to do a page in my journal showcasing THEM.

I did up this Art Journal page using Pan Pastels, Modeling Paste and a bit of mist for the background.
Just something quick laying color and texture down without any initial planning.


There were some scraps of paper laying on my desk with became the base for the photo.
Stacking random lengths, patterns bits and bobs is an easy way to use up scraps and add color and dimension to your page.

The finishing piece is a metal heart I created using wire around the photo.
I hand tacked it down with thread to the page (my glue wandered away again lol).

The title was half stamped and half handwritten incorporating some of me onto the page.

Thanks for stopping by and have a great day.

Tuesday, November 12, 2013

Just sharing some layouts today


Sharing some layouts today that have all been featured in
Scrapbook News and Review.
They feature my favorite subjects (the girls), and are mixed media and layered
papers.

Alles ist Gut
is done on a piece of craft card stock.
Gesso was scraped through a Stencil Girl stencil, as well as dripped onto and painted
around the page.
Some Lindy's Buccaneer Bronze mist was also added and dripped down the page.
A few scraps of paper, including a brown shopping bag were layered under the photo.

Forever and Ever
When the little one was small she used to hold everyone's ears, 
both to comfort herself as well as when she saw others in distress.
I caught the 2 youngest in the act one day. The baby was comforting her big sis. No matter how they fight (and boy do they fight!) they will always be there for each other.
Lots of distressing, paper layers and machine stitching on this page.

Lovely Smile
Some paper layering, misting through a Crafter's Workshop stencil and using some FabScraps chipboard to create this page.
The large SMILE is a Kaisercraft rub on.
Try placing them over a large spot on your photo. They'll look like you took the pic just for them.

Thanks for stopping by and have a great day!