Tuesday, April 30, 2013

Cards galore.

Every once in a while I get into a card making mood. 
I have to admit that cards are not my favorite form of paper crafting, but there are special people who I will actually take the time and make one for.

Today I want to share a couple that I have done up recently...

Some were featured in Scrapbook News and Review, others were for a recent swap over at Flying Unicorn ( have yet to meet a swap I don't like lol).

This one was featured in SNR. I bought a kit of epherma on Etsy that was color coordinated, I wound up using bits and pieces to create this card.

This card too was featured in SNR. The call was to use Inchies on a card. I stamped the Queen's Anne Lace (Club Scrap) and cut it into 4 1x1" pieces. Just a little bit of layering and distressing to finish it off.

This card was featured in SNR but I made it as a sample for my All About Resists class over at The Art Studio.
The stamps are all by Club Scrap.

Another card featured in SNR but also made as a sample for my All About Resists class over at The Art Studio.
The stamps again are from Club Scrap. Ranger embossing powder and Distress inks for color.

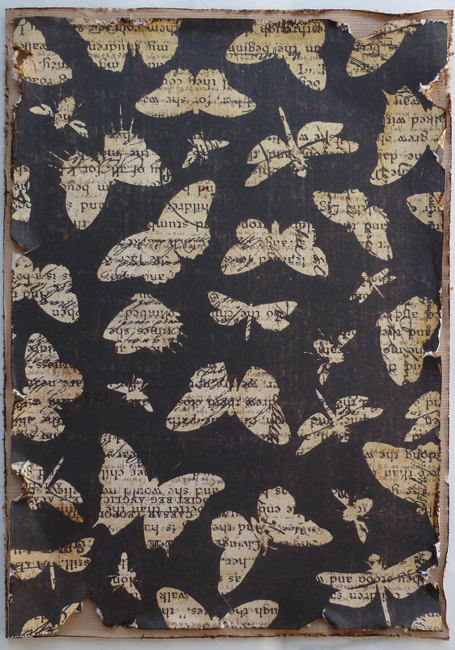
This card was for a swap at The Flying Unicorn.
The background is book text misted with Lindy's Stamp Gang mist, then stamped with Stone Grey Solvent ink.
The butterflies are Maya Road, misted then embossed with clear ep. The sentiment was stamped onto a small piece of Washi tape.

And finally;
a Happy Birthday card using up a bunch of scraps. Gessoed then stamped on, the image colored with Faber Castell Big Brush pens. Stickles were added to the flowers for a bit of glitter


  So that's the card share for today. I think I'm going back to 12x12 pieces for a while, I do like my larger pieces lol.

  Thanks for stopping by and have a great day

Monday, April 29, 2013

Cast your spell...


Ok, Ok
I know it's no where near Halloween but I wanted to share this layout I did for Scrapbook News and Review.
My attempt to show that you DO NOT need to so layouts on just paper.

The base of this layout is a piece of 12x12 cradleboard (most art supply and big box stores sell them).
I love working on wood, it doesn't warp, bleed, buckle or fall apart no matter what you do to it.

   I first covered the board with a layer of Black Gesso. The great thing about Black Gesso if you have never tried it is how quickly it covers and dries. It provides a different spin on the traditional White Gesso.
 
  It is then spray heavily with Lindy's Stamp Gang (Ghostly Gargoyle White) mist. Hard to tell in the photo but you can sort of see some of the drips. The tag and Tattered Angels frame were misted with LSG Witch's Potion Purple mist, and the background of the title is LSG Hag's Wort Orange.

  I layered a piece of German text and a scrap of striped paper under my photo. Stamped some flourishes and bats with silver ink and finished it off with a large black spider, a strip of tulle and a key.

 I crack up at this picture, what you can't tell (but might get a sense of) is that the little one is chewing me out for delaying the start of trick or treating. She'll usually pose willingly but not if it is standing in the way of free candy.


  Thanks for stopping by and have a great day.

Thursday, April 25, 2013

Layouts to share....

I've spent the last 10 days entertaining a visiting Mother AND Mother In Law, which unfortunately hasn't left me much time to play.
I thought I'd share some past layouts today.
All have been featured in Scrapbook News and Review.


In this one I just misted heavily in one spot and blew it out with a straw.

This is the look you get when you have been traveling across Europe for several weeks. They will willingly pose only so long and then....

Just the baby girl, she ALWAYS is happy to pose.
Everyone leaves tomorrow and then I get my craft room back, YAY.

Thanks for stopping by and have a great day

Friday, April 19, 2013

Distressing a card


If you ever look at my scrapbook layouts, you can immediately see how much I enjoy distressing my papers.
This isn't limited to layouts though, you can distress the papers on your cards just as easy.

Today I would like to share a quick tutorial on distressing papers for a card to create a shabby chic finished piece.
This tutorial was previously featured in Scrapbook News and Review.

Supplies 
Brown ink
Brown mist
several coordinating papers
Distressing tool
Make a card base 5x7 and set aside. Cut a piece of patterned paper 4.75 x 6.75" and distress all sides. Ink with the brown ink.

Cut a piece of a 2nd patterned paper 4.50 x 6.50". Again distress the sides of the paper, tearing into it heavy in some spots. Ink the edges with the brown ink.

Layer the second piece of paper on top of the first. Using your blending tool to apply more ink in spots on the paper.

Cut a piece of patterned paper 4x6", cut another piece 3.75 x 5.75".
Distress all the sides of the paper, tear in spots, then ink.

Layer the papers onto your stack.

Cut a neutral piece of patterned paper about 3x5" and distress all the sides. Ink the edges and use your blending tool to apply more ink to the top of the paper.

Add it to the stack, layering and making sure all layers are visible.

Mist the stack with brown mist. Adhere it to your card base.

Add a focal image (here I cut a butterfly from a piece of patterned paper), your sentiment, and a bit of fiber tied on the side.

Thanks for stopping by and have a great day!

Tuesday, April 16, 2013

Memories...with some help from Swirlydoos

Every month I participate in the Round Robin challenge over at Swirlydoos.
This month I get week 2 and followed Cheryl.

Here is my take on what she did. I wound up using the April kit from Swirlydoos, it just fit my picture perfectly.
The twist this month (and there is always a twist) was to use a stencil and some goop. Now the twist is always optional and by the time I was working I used a stencil but instead of goop, used mist.
For me it was what worked better this time around

I layered and distressed several of the patterned papers from the kit.

Cheryl used a large doily under her photo. I liked it but wanted my twist on it. I used the doily stencil from Pink Paislee and Coffee Shop Glimmer mist. Gives the doily look but blends in a bit.
The flowers and wood are both from Prima as well. I misted the wood with the Coffee Shop Glimmer mist to color them.

Along the bottom of my photo and mat I used a Kaisercraft rub on. Cheryl used words for her strips but again this was my twist on her design.
The title memories comes from a scrap of 7 Dots Studio paper.
  The Round Robin challenge is one of my favorites each month. To see how the layouts progress from week to week as each of us put our own spin on things is really fun.
Stop by the forum soon to see what everyone else is doing.

  Thanks for stopping by and have a great day!

Monday, April 15, 2013

April Sketch challenge @ Scrapping Everyday Miracles

         It's time for the release of the April sketch challenge at Scrapping Everyday Miracles

     This month we're trying something new! We have TWO sketches...one layout sketch and one card sketchYou can take your pick of the two and create either a layout or a card. Both sketches are from PageMaps.

                                              The TWIST?...use Washi Tape!

*NOTE-Our readers can choose to do one or both sketches...they will get 1 entry in the drawing for each sketch they do!

The Sketches


For my sample this month I took the layout sketch....
   and did up this layout.
          My middle daughter on the beach in Maine. I love this quote for her. She has so much potential and I want her to always believe in herself. She is destined for great things!

Closeups:
The banner is from Heidi Swap and misted with Lindy's mist in Tibetan Poppy Teal.


The background is Prima paper which I Put Gesso through a Crafter's Workshop stencil, then heavily misted with Lindy's Stamp Gang & Maya Mist.

There is Washi tape and book text layered under the photo for more depth.

Do you want to link up with us?

Create your entry using one, or both of the sketches and head on over to Scrapping Everyday Miracles and link it up.

Thanks for stopping by and have a great day!

Sunday, April 14, 2013

Scrapbook News & Review April 2013 issue...now available


Now available!
                                       Chock full of inspiration it's ready and waiting for you.


                                                     Head on over today to check it out.

                                and while you are there... Do YOU want to get published?

The following is a complete list of available calls for Volume 6, Issue #5. Please feel free to submit artwork for as many calls as you like. To submit, please go to the front page at www.scrapbooknewsandreview.com, log in to your account or register for one, and then click on Calls and Submit Your Artwork.
                                               
                                                    Check out the magazines call list
                                                 Deadline for submissions is April 24
         
                                                   Paper & Digital Scrapping
Please Note: For Scrapbooking and Cards & Stamping calls, projects can be submitted in any size. For example, layouts can be 6”x6”, 6”x12”, 8”x8”, 8.5”x11” as well as the traditional 12”x12” format.
Deadline: April 24, 2013

Babies
Chevrons
Color of the Month: Orange
Free for All (Any Theme)
Keep It Simple, Sweetheart (Clean & Simple)
Mixed Media on Layouts
Punches & Die-Cuts
Sports & Action

Cards & Stamping 

Deadline: April 24, 2013
Father's Day
For a Child
Free for All (Any Theme)
Thank You/Much Appreciated
Trends: Moustaches

Vacations & Trip Photos

Mixed Media & More

Deadline: April 24, 2013 Arches: Fortune Cookie Sayings
Artist Trading Cards: Free for All (Any Theme)

Artist Trading Cards: Seeing Red (Color, Mood)

Inchies: Backgrounds with Gels/Pastes/Mediums


Please make sure that your images are no more than 650px on the longest side and that your photos are free of text and watermarks.


Have a great day!

Saturday, April 13, 2013

Mojo Monday...which took until Saturday


Sometimes it takes me a day or two to get something done.Sometimes it takes me a week to get something done.
Case in point the Mojo Monday sketch at Flying Unicorn.
The sketch was released on the forum on Monday buy Alda. It took me a week to get it done, sometimes what I want to do and what I HAVE to do are 2 different things.

I like it better when the 2 are the same but this week it was not to be.
I did get it done though before the new one is released so YAY.

Here is the sketch.

and here is my take on it.
I used the new April kit from Flying Unicorn.
The papers, stickers and die cuts are from Prima's Lifetime collection.

For more pattern on my background paper I scraped Gesso through a stencil by Stencil Girl and once dry misted it with Coffee Shop Glimmer mist.


  I added some tape and staples to finish it off.
Done...I'm ready for Monday!

  Thanks for stopping by and have a great day!

Friday, April 12, 2013

Going small...


I'm in the mood for some small art so I thought I would share some ATCs from past issues of Scrapbook News and Review.

In case you aren't familiar with what ATCs are, the letters stand for Artist Trading Cards. Small works of art measuring 2.5" x 3.5", they can be worked horizontally or vertically as desired, and as simple or as elaborate as the space allows.
ATCs are fun ways to try out new techniques, play with old, and create art to swap with art friends all over the world.

Below are samples of different styles and techniques I have used for recent ATC creations. While I did say that they can be worked either horizontally or vertical, you can probably guess my favorite way is vertical.


Acrylic paint, torn magazine pages and masking tape make up the background of this ATC.

Acrylic paint and stamping were used on this one.  


Fusible webbing and scraps left on my desk make up this one. Fusible webbing is fun to use to create new sheets of background materials.

Gesso resist with glimmer mist on canvas. A few rub ons and a sticker complete this simple one.

Collaging is always fun to do on ATCs. Even the smallest piece of paper has a place here.

  As you can see they may be small but they sure can pack a punch. Next time you feel like paying with your supplies why don't you try going small.

  Have a great day and thanks for stopping by.

Wednesday, April 10, 2013

New Art Journal class coming Friday....


On Friday I'll be teaching another installment in my
Creating an Art Journal page series over at

Do you collect mists and stencils like there’s no tomorrow? Want to use them in your art journal but aren’t sure how to where to start? If so, then this class is perfect for you. Part of the ongoing Creating an Art Journal series, this one-hour class will take from the start to finish in creating an entry for your art journal. And you’ll use up the stencils and mists you keep buying, along with a little bit of paint, to create a page when you can truly leave your mark.

Warning: You’ll get messy in this class!


  The class, as with all in the series, will be $5.99 and include step by step instructions as well as videos taking you from a blank page to finished piece.


If you missed the first 2 in the series they are still available as well...


Play

                                                                          and


Top 10

   So come on over, learn some new techniques, play with your supplies and create some fun art with me.

  Thanks for stopping by and have a great day!

Monday, April 8, 2013

Don't be Sorry....

Flying Unicorn has an art journal challenge every month.
Usually it is a free for all no theme just play but this month we were given the task of using the word "live" someplace on the page.

I have been experimenting with some techniques for an upcoming Art Journaling class over at 
The Art Studio  and cam up with this page.

There are a ton of stencils again (I've found that by keeping my box of them out I am using them now more than ever) and Lindy's Stamp Gang Starburst Sprays (still my favorite mists on the market).

The quote is a favorite of mine by Kerouac.

Some closeups...

My only complaint...The small stickers I used for my quote DID NOT STICK!
I had to go back and glue them all down after I thought I was done, hence the smudges on the letters.
Talk about frustration, it really drives me crazy when something you spend money on doesn't work the way you want or expect it to.

  Well that is it for today.
Thanks for stopping by and have a great day!

Saturday, April 6, 2013

Sleepovers and Gelli Art play

Last night my 13 year old daughter was having a sleepover and wanted to "make art".

After offering several suggestions as to what they could do, they finally explained they wanted to make Gelli Prints. They had been looking at the ones I did the other day and thought it was just the coolest thing.

The fantastic thing about Gelli Printing....It's easy enough that I could set them up and with little guidance from me, they were able to create over 25 prints in just under an hour.
They had a blast deciding on colors and patterns and trying different things on the plate.

I set them up with a bunch of paint and my overflowing box of stencils and they went to town!

Here is my daughter working.


And here are a bunch of prints they made.

We used stencils from Crafter's Workshop, Donna Downey, and Stencil Girl products


They also used stencils from Club Scrap and various pieces of punchinella and lace die cuts from Basic grey for texture.

  It was another successful art filled sleepover. Now to decide what they will do with all their prints....That might be another sleepover.

  Thanks for stopping by and have a great day.